OneSignal successfully migrated from our previous dedicated-cloud hosting provider to packet on June 9, 2017 with only two minutes of downtime. In doing so, we reduced our infrastructure costs by 25%, reduced storage costs by 50%, and expanded our capacity. Aside from the technical and financial benefits, we felt that packet would best meet our long-term needs as we grow.
The remainder of this post details exactly how the migration was performed. To provide background, we first present an overview of our service architecture. Following that is a discussion about securely replicating databases over the internet, and standing up and testing our new installation on packet. Finally, we walk through the actual switchover to the new host.
Service overview
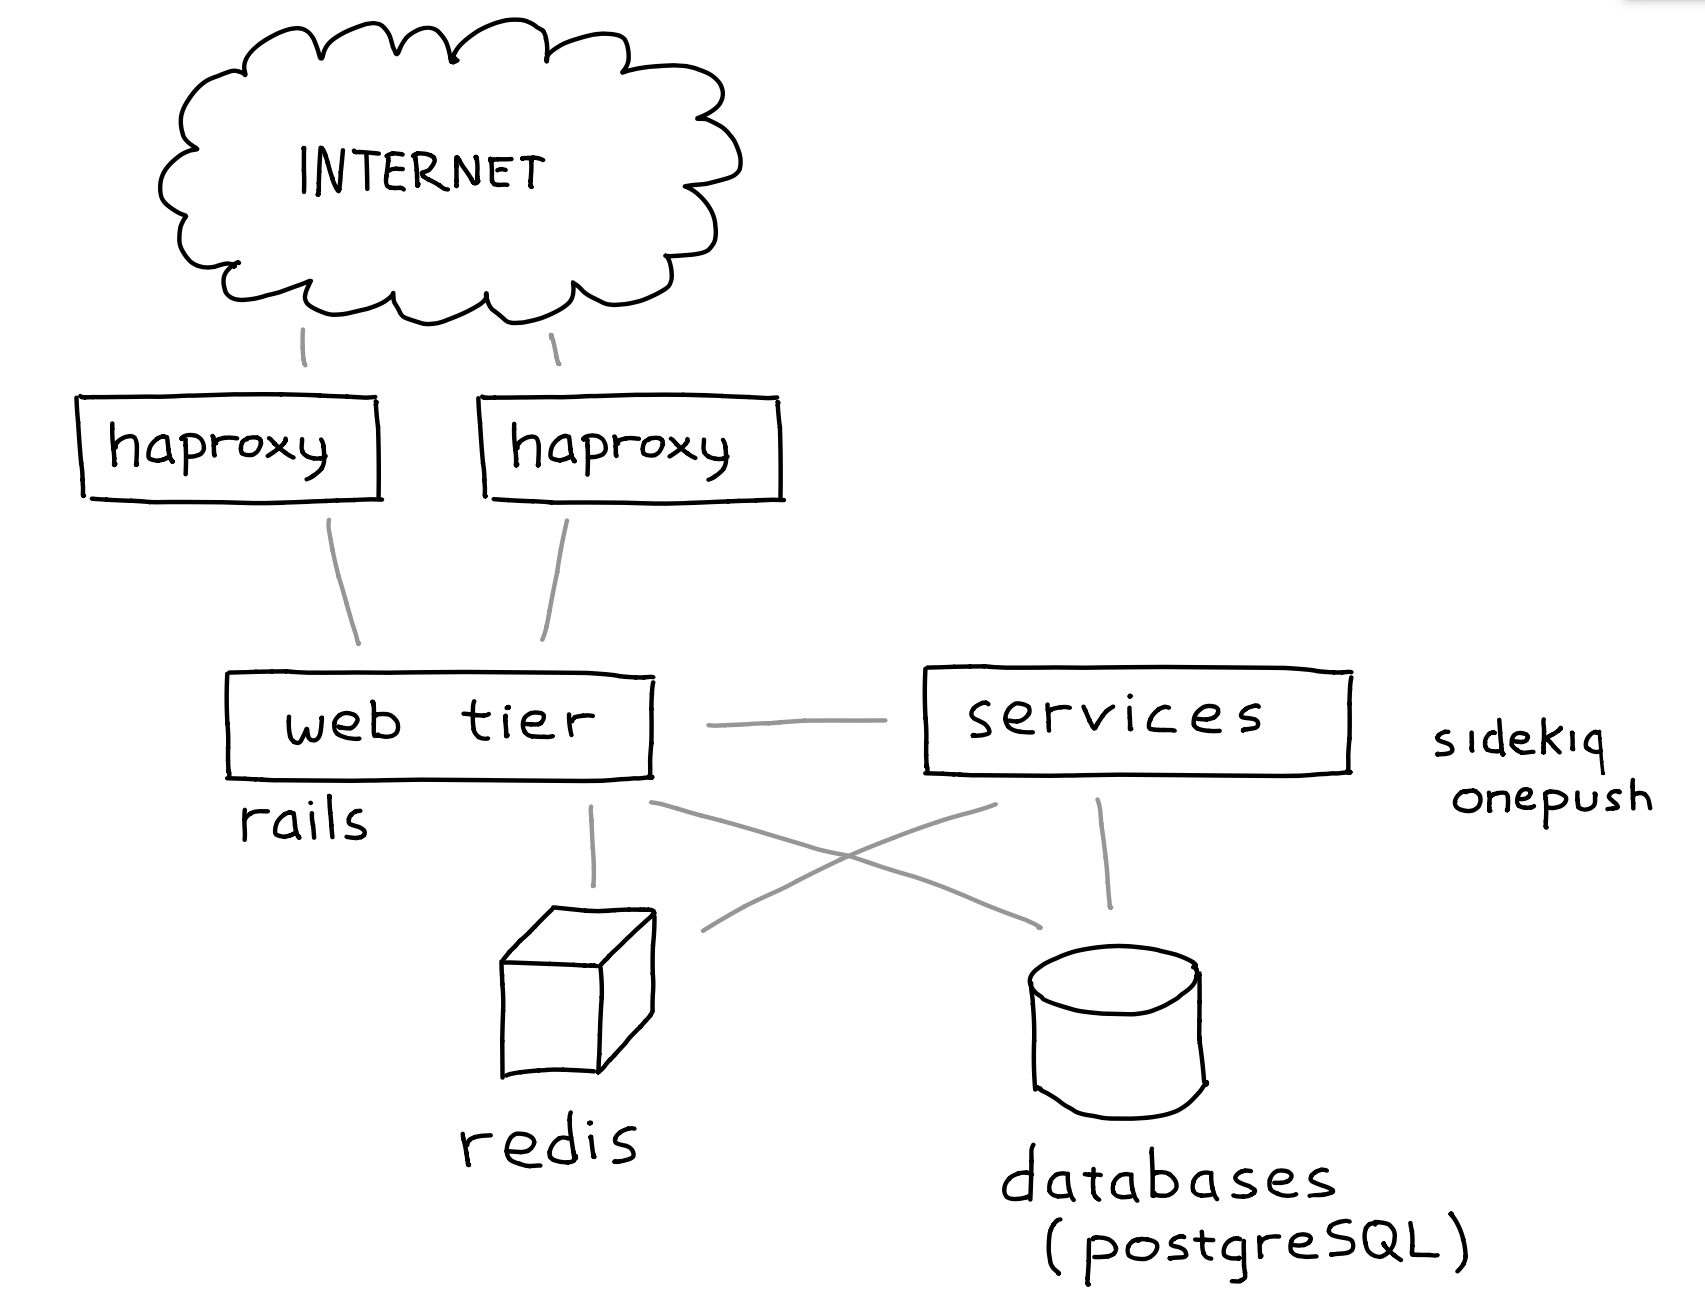
OneSignal is structured as a fairly traditional web service.

At the edge, we have two servers running haproxy to handle routing, rate limiting, and filtering before passing requests on to the web tier. The web tier is a set of servers running Rails behind NGINX and Phusion Passenger. The service tier includes Sidekiq job runners and our Rust-lang notification delivery service, OnePush. Finally, the storage layer includes a Redis server and a set of PostgreSQL servers.
The load balancers, web tier, and service tier can all be setup on our new infrastructure at any time--there's no persistent data locally, all data is stored in either Redis or PostgreSQL.
The database servers are the tricky part. When we cut over from one installation to the other, all of our data needed to be up-to-date at the new site. Fortunately, both PostgreSQL and Redis come with support for replication. The only hurdle then is replicating securely across the big scary internet.
Securely replicating databases over the internet
Great care must be taken when replicating production databases over the public internet to ensure its safe-keeping. There's a couple of ways to do this securely: setup a VPN to bridge your old site and your new site, or use TLS and public-key cryptography.
We opted to use TLS and public-key cryptography to replicate our databases. TLS ensures that communications between two peers are private (encrypted) and that the contents haven't been lost or altered. Public-key cryptography provides authentication so that the client and/or server can be sure they are talking to an allowed peer.
You're probably familiar with public-key cryptography from the perspective of a web browser. Websites you visit provide a public key which your browser then checks for a signature from a trusted certificate authority (CA). If such a signature is present, you can be sure the server handling your request is actually the one you expected.
Perhaps less commonly known is that public-key cryptography can also be used for client authentication. In this case, a CA issues a client certificate, and peers can verify its validity by checking for the signature of a trusted CA.
PostgreSQL fortunately supports TLS and client certificate authentication natively. Redis, however, does not support either. Fortunately, there is a tool called stunnel which can provide those features to applications that don't natively support them.
To configure our services to use these security mechanisms, we need to have a source for trusted client and server certificates. For an internal-only use case like this, it's sufficient to be one's own CA. We're not going to cover the details here, but this excellent guide demonstrates how to do so with OpenSSL. Here's what's needed:
- CA certificate chain which is used to verify certificate signatures
- Signed server certificates which are used to identify replication hosts
- Signed client certificates which are used to identify replication clients
PostgreSQL and stunnel should be configured to use only the CA certificate chain generated yourself. That way, the only server and client certificates that will be trusted are the ones you generated. This guarantee cannot be had if other CA certificates are present in the chain.
In addition to using public-key crypto, it's a good idea to configure the server firewall to only accept connections from hosts you explicitly trust. This means that you have a default drop rule and whitelist only trusted hosts.
Discussing specific configuration of PostgreSQL and stunnel is outside the scope of this post, but there are plenty of tutorials and documentation (especially for PostgreSQL) available on the internet.
Preparing the new site
With certificates in hand, we were then prepared to setup our service on the new servers. At a very high level, this basically amounts to:
- Provisioning monitoring infrastructure
- Starting replication of PostgreSQL databases
- Starting replication of Redis via stunnel
- Provisioning and running our web tier and loadbalancers
- Provisioning, but not yet running our Sidekiq job runners and OnePush
The very first thing we provisioned was our monitoring solution. We use InfluxDB to keep track of metrics we collect and Grafana to visualize them. Every other server runs an instance of our metrics collection agent and reports to InfluxDB. By provisioning InfluxDB and Grafana first, we are able to immediately see the impact of any changes we make throughout the rest of the setup and testing process.
The web tier and loadbalancers were started as soon as replication had completed (base backup applied, streaming replication caught up). The Sidekiq runners and OnePush were not not started immediately since they would immediately try and run jobs and generate errors due to replicas being in read-only mode.
We manage our infrastructure with an IT automation tool called Ansible. We used the same set of Ansible roles and playbooks that we already had to manage the previous site. The only changes necessary were adding more configurability to our custom roles to reflect the differences in hardware. Standing up a replica of our infrastructure wouldn't have been nearly as painless without tools like Ansible.
At this point, there was a near replica of our site running on packet. Before we switched over, we validated a couple of things:
- Our new hardware was reliable and working as expected. For this we ran streaming replication for a couple of weeks and a series of analytical workloads.
- Our service as a whole was configured correctly on this new infrastructure. The subsequent section discusses how we tested this.
Testing the new site
In the first set of testing, we ran a variety of read-only queries against the new site to exercise as much of the stack as possible. The second set of testing involved routing read-only production traffic from the old site to the new installation. For services that could not yet be started (Sidekiq, OnePush), we validated connectivity with our PostgreSQL databases and Redis and that they were configured correctly.
The first tests we ran were a set of cURL commands against read-only API endpoints. These API requests were designed to exercise as much of the new installation as possible including Rails coverage and reaching all of the databases. This process helped us identify and resolve several errors before moving onto the next phase.
With additional confidence from our test suite, we began routing read-only production traffic from our old load balancers to the new ones. Initially, we only routed SDK traffic which is known to retry in case of a server error. Traffic volume at first was only 1 request/second. With no errors encountered, this was ramped up to 100% of our read-only traffic over time. Doing this provided us with a lot of confidence in the new installation as we moved into the switchover.
The switchover
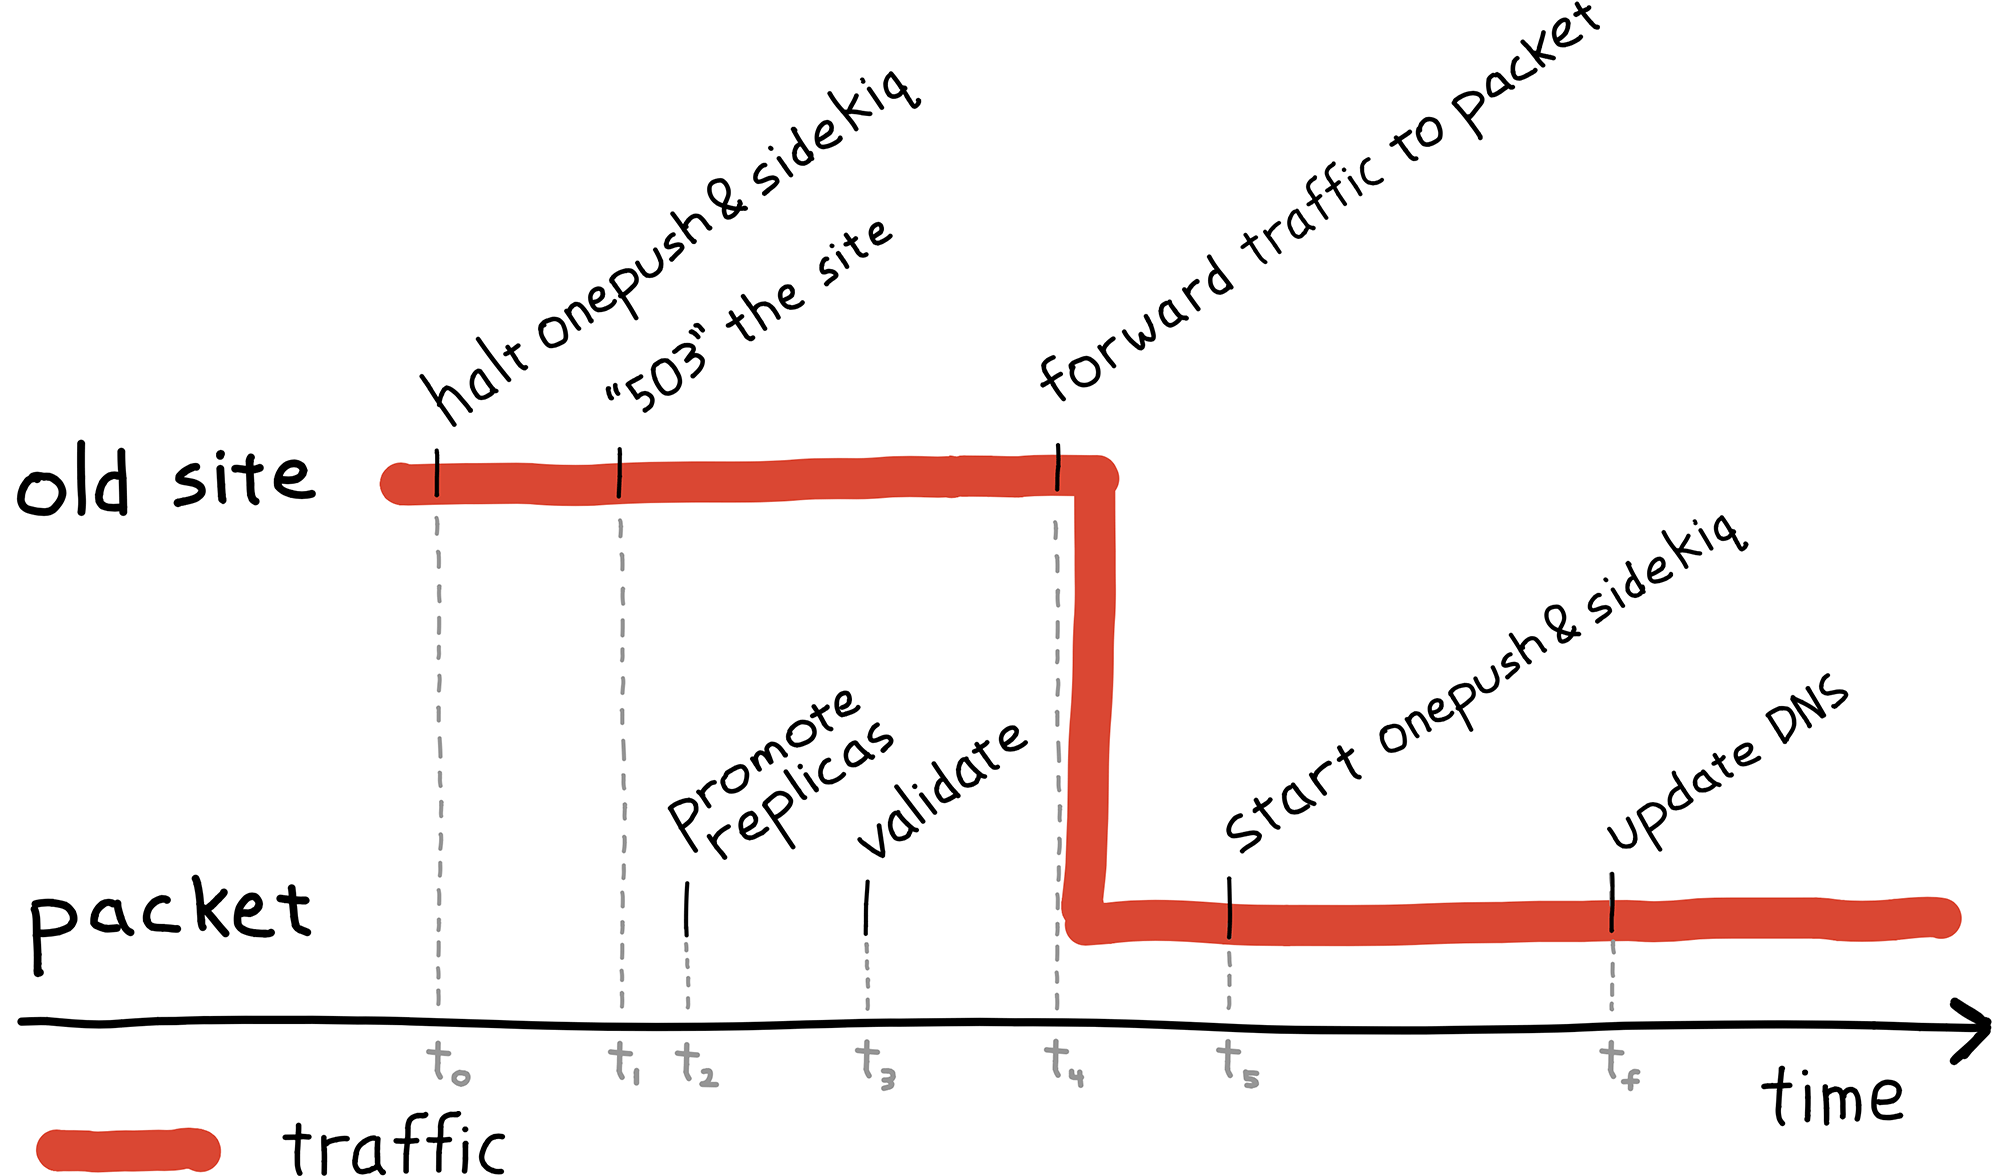
We were now ready to direct all traffic and move delivery processing over to the new installation. The following diagram may be referenced to clarify when and where certain events are happened and to provide an overview of the entire process.

The diagram is split roughly into two areas: events happening at the old site, and events happening on packet servers. Each event is timestamped on the horizontal access (time) which increases to the right. The timestamps are used in the following discussion to tie events back to the diagram.
- Old site
- t0 -- Halted push delivery, job processing: stopped a large portion of writes to both Redis and PostgreSQL.
- t1 -- 503 onesignal.com: stopped remaining writes to Redis and PostgreSQL. The 503 was done at the web tier so that the load balancers could easily be redirected to the new site when it was ready for traffic.
- Packet
- t2 -- Promoted replicas: With all writes stopped to the databases, we checked that the replicas are synchronized and promote them to leaders.
- t3 -- Validate functionality: We've extensively tested read traffic at this point, and now we verified write traffic was working. A script of cURL commands was run against the site as a quick sanity check. If there were a problem at this point, it would have been easy to revert with no data loss.
- Old site
- t4 -- Forwarded traffic to packet installation: This effectively "turned on" the new site. Production traffic is now being handled on packet.
- Packet
- t5 -- Started push delivery, job processing: With traffic flowing, notification delivery was reenabled.
At this point, the site had been fully moved. The only remaining detail is that DNS was still directed to the old load balancers. The final step was then updating the onesignal.com DNS to point directly to our new load balancers.
The entire migration switchover took only a few minutes, and we recorded only 2 minutes of downtime.
That's all, folks!
We hope that sharing our migration story might be helpful to others migrating hosting providers. To summarize, these points helped ensure our successful migration:
- Using public-key crypto and TLS for securely replicating databases.
- Tools like Ansible make managing infrastructure a breeze.
- Testing! Validating a new installation with a test suite and production traffic can provide a great amount of confidence.
- Having an exit plan; if things don't go right, know how to abort the switchover with minimal downtime and data loss.
Our engineering team tackles a lot of interesting problems as we continue to
scale our service. If you think you might be interested in working with us,
please check out our job openings.
Thanks for reading!


